FREE YARD KART PLANS
Introduction
Building a go kart is the most satisfying parent/child
project I can think of. The smile on a childs face when they drive a
go kart for the first time is priceless. We have put together these
free go kart plans to help others who want to take on a similar project.
The following is a step by step guide based on the very first go kart we
built. There are many things we would do different, however, this
information is free so read through it and use any of the ideas you find
helpful.
Our free go kart plans are the perfect tool for the
first timer who needs help taking an idea and putting it all together.
These plans are for a very basic go kart that is easy to build. If you
have metal working tools that can cut, grind, chop and weld and you have the
motivation to take on a project like this, we are confident your kids will
be the envy of the neighborhood.
Go
Kart Overview
The go kart in these plans is a two seater using a
6.5hp engine. We used a solid rear axle which works great for on or
off road driving. We also used a simple centrifugal clutch which is
easy to install and works great. The seat is adjustable in three
positions for children and adult drivers. This go kart is capable of
30mph. The top speed of a go kart is easily adjusted (faster or
slower) with a gear change. This
go kart has provided our children with many hours of fun and reliable
entertainment.
The Tools
Needed
You will need wrenches, screw drivers,
hammers, a square and all of the basic tools found in most garages. We also used
a welder, grinder, chop saw and a powerful drill motor. It's also nice
to have a tubing bender, tubing notcher, drill press and any other metal
working tool you can get your hands on, however, it isn't necessary to have
these special tools to complete the build.
The Materials
We used a combination of square and round tubing.
The square tubing is 1" square mild steel with a 1/8" wall thickness.
The round tubing has a 1" outside diameter (OD) and a 1/8" wall thickness.
This tubing allows for good strength. Careful consideration for the
weight of the frame is important because your go kart should be light, not
heavy. A 24 gauge sheet metal can be used for the floor of the go
kart.
The Parts
Many of the parts, such as wheels, tires, pedals,
spindles and brake components are from Azusa Engineering, Inc. To find
your local Azusa dealer you can contact Azusa directly at (626) 967-4167.
You can also find great deals on Azusa parts by searching eBay. The
part numbers we reference throughout this website are Azusa part numbers.
Getting Started
Start with a chalk drawing on the garage floor.
Have the person who will be driving the kart sit on the floor so you can
draw your frame ideas around the driver. This is a good time to have
some of the parts like the tires, seat, engine and rear axle so you can
place them on the garage floor to get a rough idea of their placement.
Change your drawing as much as you need until you think you have the
alignment and spacing of everything in a good position.
|
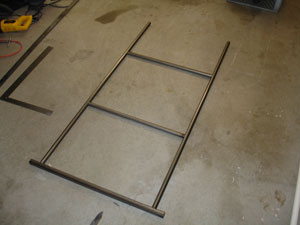 |
Use the dimensions of
your chalk drawing to cut some of the frame pieces. Once the
pieces are cut, set them on the floor. Have the driver position
themselves within the frame and place any parts you have into position
like tires, seat, engine and rear axle. check the spacing and
alignment of these parts and make any adjustments to the frame rails as
needed. |
|
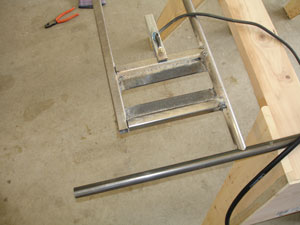
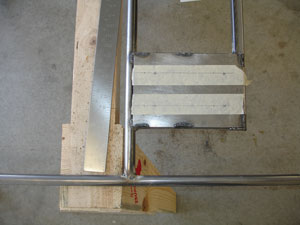
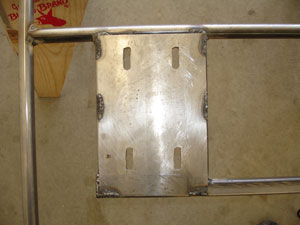
Next, we started to fabricate
the engine mounting plate. We used two pieces of 1/4" flat stock
and a piece of 16ga. sheet metal. We made slots in the mount where
the engine will bolt to the frame. The slots will allow for chain
adjustment by sliding the engine forward or back. You can save
yourself a considerable amount of time using an Azusa engine mounting
plate. (part# 8190 or 8191) |
|
 |
 |
 |
| |
[ Up ] [ Next ]