|
INTRODUCTION
The following is a "how to" guide for building an Azusa Fun
Kart. We chose an Azusa kart for a few reasons. First, Azusa
Engineering has been in business for a very long time proving they provide
quality and customer satisfaction. Secondly, Azusa has every part
needed to build a complete rolling kart down to the last nut and bolt.
Lastly, Azusa has the most affordable go kart parts available. This
makes the Azusa Fun Kart the perfect choice for a parent/child project that
will build wonderful memories that will last forever! |
| |
|
OVERVIEW
The Azusa Fun Kart is a simple to build go kart that only
requires basic hand tools to build. No welding is necessary to put
this kart together. We used a Honda GX200 clone engine purchased from
www.affordablegokarts.com.
Our kart reaches a top speed of 30mph, however, the top speed is easily
adjusted faster or slower with a simple gear change. The Azusa kart is
the perfect size for children ages 6 to 10. You will see we added an
extended bumper to our kart so older kids and adults can drive too. |
| |
|
GETTING STARTED
You need parts before you can do anything. Azusa sells
this kart as a complete kart or the parts can be purchased individually if
there are certain parts you want upgraded. Azusa does not sell to the
public so you can contact them at (626) 967-4167 to find your nearest
dealer. You can also find great deals for Azusa parts on eBay.
This kart is sold as a complete kit with nylon wheels as part number 3557.
The kit is also available with aluminum wheels as part number 3551.
Here is a list of
part numbers for all of the parts needed to build a complete Azusa Fun
Kart. You will need to add an engine and clutch to the list which is
not sold by Azusa. |
| |
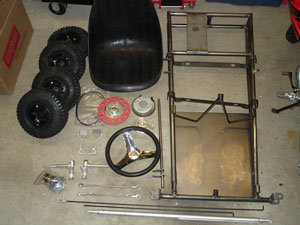 |
Here are the Azusa part you will start with.
The Azusa sprocket is not red like the one pictured. We had an extra
sprocket we decided to use. You will also need to add an engine and
clutch to this group of parts. For great prices on engines, check out
www.affordablegokarts.com. |
| |
|
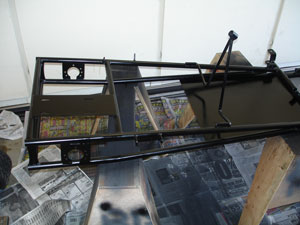 |
The first thing you will need to do is paint the
frame and steering shaft hoop. We cleaned up the frame with steel wool
and then sprayed on a couple coats of primer. The kids chose black for
the color and under my supervision, they had their first painting
experience. Allow the paint to dry overnight before attempting to put
the kart together. |
| |
|
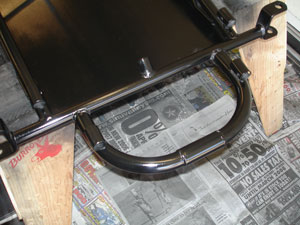 |
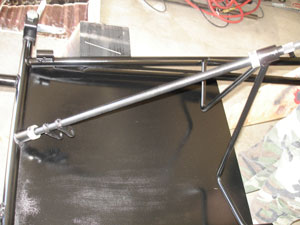
We added a front bumper to our Azusa Fun Kart so
we could mount an extra set of pedals for the taller drivers. We had
to bend some tubing and weld it to the frame in order to accomplish this.
In the end, the extended pedals worked out great. |
| |
|
 |
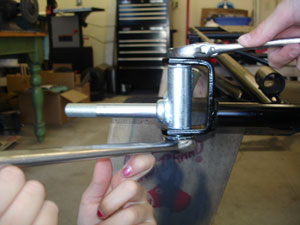
We also welded this tab to the frame in order to
use and extra band brake we had. Since we already had a brake, we did
not use the 6" Internal Expanding Brake which comes as part of the go kart
kit. We will discuss both brake setups a little later. |
| |
|
 |
We will start at the front of the kart and
install the spindles. The spindles come with four split nyliner
bushings (two for each spindle). Install these bushings into the
spindles. Place each spindle into the "C" shaped spindle brackets.
When properly installed, the spindle arms will point up and to the rear of
the kart. The bolts that hold the spindles in place are called the
king pin bolts. Insert the king pin from the top and secure with a
lock nut. Tighten the lock nut then back it off just enough to allow
the spindle to swing freely inside the bracket. |
| |
|
 |
Now install the steering shaft hoop. The
hoop slips into two pieces of tubing that are welded on the top frame rails
of the kart. Slide the hoop in from the front of the kart. Now
you can install the steering shaft. Slide a locking collar onto the
spline end of the shaft. Insert the spline end into the steering hoop.
Now put a locking collar onto the bottom of the steering shaft and insert
the shaft into the steering support tube which is welded onto the kart
frame. Slide the locking collars in opposite directions from each
other and tighten the set screws to keep the steering shaft from moving up
or down. |
| |
|
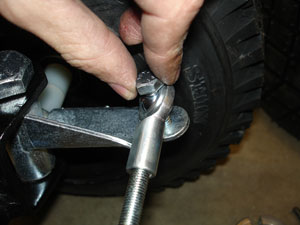 |
Screw the rod ends to the end of the tie rods.
Bolt each tie rod to the end of each spindle by placing the bolt through the
top of the tie rod and spindle and securing with a lock nut. |
| |
|
|
[ Back ] [ Next ] |